Wednesday, August 12, 2009

M16 GMC Part 3

Paint at last

I wanted to do a paint job other than a standard olive drab, or even the ever popular black over olive drab. There is a photo of 'Avenger' in the LIFE archives labeled as D-Day. It shows an M16 with the gun removed beached in three tone camouflage. Avenger has a hard edge pattern but I wasn't interested in recreating this particular vehicle, I was only interested in it's three color scheme.


With the three sub assemblies dry fit, I could make sure everything lined up correctly and tight before breaking out the airbrush. I drilled out the cooling jacket holes on the .50 cals a bit for some detail, masked off the windshield and prepared to start painting.


I don't go into great detail on the paint process in this blog, it was done pretty much the same way as the previous work done on the M4A1 below. My main interest at this point is getting to the stage of the weathering process and then the display bases for both vehicles. In the photos bellow you'll find the paint applied, markings in place, the first pin wash laid around the small details and the rubber track, tires and machine guns have been painted as well. Oh and a couple of Jerry can racks were scratch built and installed at the last minute.


The last update for this vehicle will most likely have some further weathering with oils and pigments and maybe the two or three figures I've chosen for this one. You may be able to guess that one will be a driver, partially out of the open door.

Stay tuned, the next time you see this one, it will be dug in.

Sunday, August 9, 2009

M16 GMC Part 2

Detailing the cab

Once the basic chassis assembly is complete I can begin adding the cab parts. The cab on Dragons M16 lacks a few small details and their winch option in all of the kits is missing a bit as well. Please keep in mind as you read that, I am not 'dogging' the kit, just pointing out the facts. It is up to the individual modeler to build as he/she sees fit. I have chosen to 'fix' these issues.

Comparing the first image below of the dry fit assembly with the Hunnicutt photo of the winch, we can see some of the omissions I will be addressing. Some omissions may be the result of molding limitations, others may be the result of mistakes in research process, one special not here is part number B-28, which is on the sprue but not called out in the instructions.


One of the omissions that span the entire half track series is the lack of the PTO lever in the cab. You can see a photo of the real thing below and my scratch built version. Note that unlike the other shift levers in the cab, the PTO lever is a tapered, flat stock lever and not a tubular rod shape. I've also replaced the misshapen gear selector with some brass rod.


The inner fender well area is missing some retaining/stiffening strips and their corresponding bolts. After filling in the depresions from the molds, I've added them from some styrene strips and bolts.


In these next photos you can see the actual aerial bracket and the guard on the bottom missing in the kit. I simply bent a piece of foil and added it after placing it on the assembled cab. There was also a common bracket to the M16, found on the passenger side top rail. This was used as a spare aerial mounting and in at least one case I have seen of a vehicle in Korea, a .50 cal. machine gun. I scratch built this bracket and also removed the large gussets and replaced with much smaller versions, closer to what I've found to be more common in reference photos.


As the cab assembly begins to take shape I can still find some places to super detail. The doors are on area, depending on whether you are showing the top section folded up or down. The barrel bolt style locking mechanism is molded in the up position. To show the flap down, I shave back the interior bolt rod to the ridge line seen in the photo. The battery box is lacking a bit of detail as well. Remember, it's all of these small protrusions that catch the pin washes and pigments when weathering.


A last look at the three main sub assemblies before dry fitting. You may notice the Tank Workshop suspension parts in the photo. While they do offer some added detail and accuracy, I will customize the kit parts on the next build. I wasn't completely thrilled with these parts but I'll leave it at that.

Thursday, August 6, 2009

M16 GMC Part 1

Sprucing up the quad .50

Now there are those who consider me, or those like myself to be 'rivet counters'. Usually this term is used in a derogatory manner and to be perfectly frank, it straight up old hat, boring and tiresome to put up with. I'm not sure why those people who choose to research and correct kits and those who choose to build strictly out of the box cannot both exist simultaneously in the same place, at the same time, doing what each individual enjoys without pointing fingers and calling each other names.

Enough of the soapbox rants, lets get back to modeling.

I almost never build in the order of the instructions, especially when it's a kit I'm familiar with. In this instance I've chosen to begin with the gun assembly. Using the TM 9-223 and the Hunnicutt book, I've added many of the small missing details to the assembly. The last of the three photos shows the addition of the missing welds on the gunners shield, made with stretched sprue and the tip of a broken exacto blade.


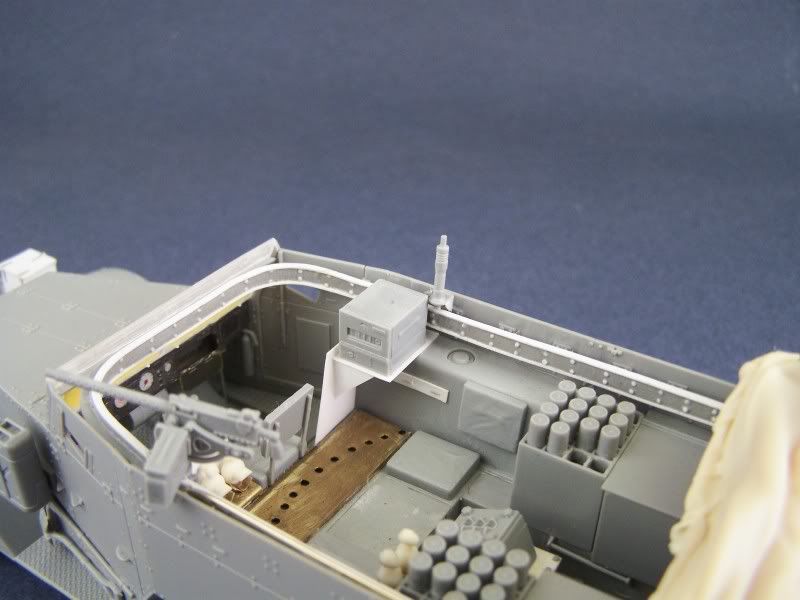
Moving on to the crew compartment itself using the same reference materials, I've added the various missing details to the gun pedestal and the grenade boxes. I've also separated the fuel tank armor from the tanks themselves and rounded off the edges of the tanks to show the gap which does not appear on the kits as it does on the real vehicle. Lastly, I've had to scribe the joint between the two folding side panels as Dragon omitted this small detail in their molds.


The layout above, with four tombstone ammo cans and the small radio shelf has been chosen purposely by me, even though there are those more knowledgeable that recommend otherwise. I have based my choice upon a wartime photo of a specific M16 called 'Hitlers Hearse', showing this exact layout. Notice in the cropping below that there is also no aerial mounted on the vehicle.


My next entry will start on the cab and get the three main sub assemblies together to prepare for the paint. You wont find too much on the frame and suspension as this is common to all of the half track kits and will be covered in greater detail in other blogs.

Monday, August 3, 2009

M4A1 Mortar Carrier part 4

Nearing Completion

This entry is fairly simple, containing only a few photos with only a couple of changes. Painting the small details is usually a time consuming process and while I have done a lot of things since my last update, they are all so small that it doesn't appear as such. Things like tool handles, machine gun handles and other small odds and ends can really stand out and give the model some life though, especially against a drab, (pun intended) single colored background. While the tool handles would most likely be olive drab in color on the real vehicle, the wood grain technique used by many modelers is done in an artistic way IMO, adding some variations of color to the finished product.

I've also shown the lenses I used for the de-mountable headlights, sitting in the storage rack in the photo below. This is the first time I used the resin de-mountable headlights from Formations and the lenses that come with. While I am happy with the effect they give considering the simplicity of the installation, they do lack the textured lines a headlight lenses would have. The kit lenses have this detail and may have been a better choice in the long run. Live and learn they say and every build for me is a lesson to to apply to the next attempt.


I've also begun laying the pigments, MIG in this case and I'm using three colors in this application to give some variation and depth. I'm trying to imply that perhaps some of the mud/dirt was deposited the day before, while some is fresh. Perhaps some of the lighter stuff is weeks old, while the darker tones are days old. Who really knows?

I apply them using a small brush and some turpentine for a fixer. The pigments will go on much darker than they will dry too, so experimentation for the correct tones you may want is recommended. Below are two overall pictures of where the model is at this stage, followed by two more photos showing closer details of the layered pigments.


My next steps will be making the display base and mounting the half track. Until that point this model will be gently placed into a box awaiting the bases construction. Once the model is mounted, there will be final weathering done to both the half track and the base, to tie them together as one. I will use that time to finish anything I may have missed or anything I am not fully satisfied with, (like the Jerry can on the passenger side and the strap for both). I will also be completing the tarp and a figure during break in this build and will return with the final update when all of the elements are completed and mounted.

Next I will begin my build of Dragons M16 GMC, hope to see you along for that one as well!

Thursday, July 30, 2009

M4A1 mortar carrier part 3

Bringing out the details

I assembled the markings from various Archer dry transfer sets to show a 3rd Armored Division vehicle, 36th Armored Infantry division, 2nd Head Quarters vehicle 41. I can't attest to the absolute accuracy of these set up but it was about the best I could come up with and will hardly be visible due to the weathering.

I applied one final misting from the airbrush to tone down the fresh white color of the markings and went over this with a rough wash of oil paint. I followed this with a more precise pin wash to the raised details and panels lines.

After painting the tracks, road wheels and front tires in Floquil's 'Grimy Black' I added a bit more gray to it and painted the machine gun. The next step was to add a bit of brown to that mix to paint the fiber tubes holding the mortar rounds. For a bit of bare metal shine on the drive and idler sprocket, I used an artists graphite pencil.

A mix of some olive drab and khaki went on the tarps and bedrolls, these will get more various shades applied to them later but this served as a fairly decent base. I lightened the mixed and painted the straps holding all the stowage and then put a little gray/green mix on the buckles.

The last step was some random dabs of paint, some done with a torn piece of a 'Scotch Brite' pad and some with a fine brush. This was applied in the general 'chipping' technique application, although I don't necessarily mean to portray paint chipping as much as general scuffs and smudges.


Wednesday, July 29, 2009

M4A1 mortar carrier part 2

Paying the spraint.

But first, a last look at the details I've added since the basic construction. A bent aerial base since the antenna will be tied off to the bumper, tarps and bedrolls are made from packing tissue paper soaked in diluted white glue, medical gauze for the camo net, the straps are from a foil wrapper with PE buckles from Aber and some fine beading wire and small chain from Micheal's craft store for the winch.


One of my most favorite times in a build is breaking out the airbrush. There isn't any cut fingers, lost parts to the carpet monster, mold lines to remove etc. It is also the place where you can express yourself however you want, some choose factory fresh, others choose just this side of destroyed, to modulate or not to modulate, accuracy or artistry. Whatever you do is your choice, we all have our own personal preferences and that's where the individualism really shines through, the finishes we choose. Without these choices, everyone would be building the same exact kit and where's the fun in that?

After spraying a primer coat of flat black and letting it sit for a few days, I have begun applying the various shades of olive drab. For this build I am using LIFECOLOR paints and I truly love their Allied green set for OD choices. I like the way they go on, both for brush painting and as you will see here, through the airbrush.

I lay on a base color with the darkest shade and work my way up to a lighter shade leaving some of the black primer coat visible in recessed panel lines and on outer edges, I believe this technique is referred to as pre-shading. It wont be as pronounced on the finished product but for it to have any effect in the end, it should be rather obvious at this stage.


Next will be the detail painting of the separate stowage items and tools, some oil paint weathering and then pigments. Of course, I'll have to mout those tracks, tires and running gear first!

Thanks for watching.

Monday, July 27, 2009

M4A1 mortar carrier part 1

Ruining a perfectly good kit.

The mortar carrier I chose to build this time around, (I have three more in the stash) is a 3rd AD version. Ask anyone who's seen an M4A1 mortar carrier with the mortar facing forward and they'll probably tell you about the 2nd AD and their 'funnies'. While the 2nd AD definitely has the spotlight, the 3rd AD certainly gets my vote for the better design.

If you are familiar with the crew compartment layout of the M2, you'll know the fuel tanks were at the rear and the stowage boxes in the front, the M4 was based on the M2, being the only true 'variant' in the whole half track series. The improved mortar carrier M4A1 raised the mortar on a pedestal and had a base for the bi-pod to allow for traversing. The 3rd AD weren't satisfied, and went to work on their M4A1's.

By removing the side armor, from the entire crew compartment, swapping the fuel tanks to the front and the stowage boxes to the rear they could leave the elevated pedestal in it's place and have the bi-pod to fall directly behind the cab. Placing the left side armor on the right and the right side on the left, they had the access doors to the rear of the vehicle to match up to the now moved stowage boxes.

This is an interior shot of a 3rd AD mortar carrier during training prior to D-Day, it should be apparent with some careful study, that something is out of the ordinary.


Now the biggest problem with this plan is that the sides of the fuel tank are molded to the side armor and the fuel tank armor is molded to the floor. After some careful surgery and re-attachment, followed by some scratch building of the rear exterior stowage boxes and a brass traverse plate, the crew compartment looked like this.


The mortar carrier was from what I can gather up to now, was built by only one manufacturer, the White Motor Company. Many of the other half track models were built by two and sometimes all three manufacturers, Diamond T and Autocar. The manufacturer responsible for mainly lend lease vehicles, International Harvester not included of course.

White seemed to have two styles of skate rails and most of the mortar carrier pictures I've seen show the later style. The early style was a solid one piece welded gusset design, while the later style was more flimsy and made up of thin bolted brackets. Perhaps to save on raw materials, perhaps to cut down on wieght. Whatever the case, I tried to emulate this style the best I could, hopefully my future attempts will improve.


For the last bit of this entries photos I decided to add the de-mountable headlight brackets scratch built from brass and using resin headlights, The radio shelf and radio, the .30 cal MG and a resin rear tarp made by Blast IIRC. My next entry will be the last few details and then paint!

Thanks for following along.