Thursday, December 8, 2011

Current projects on the bench


 Wont get too in depth here, just a brief update to keep things fresh. I have a few things going on and I figured I might share a couple.

First up is a little wonder of engineering, the MiniArt 1/35 WLA Harley Davidson. Not a kit for the faint of heart, half the parts are smaller than the sprue gate they are attached to. Seriously finicky work, especially those photo etch spokes. I have it painted and just started pin washes and filters, gonna make her dirty though, I have some neat photos of filthy bikes I'm using as reference. More to come.


Here's a little update just for Geo and Eryk, I've been slacking on 'the fastest hunk of junk in the galaxy' but it's a huge undertaking and I get burnt out quick. I thought I'd share just a few shots of what it currently looks like, I have a long way to go yet. I hope to get back to it and get the red, yellow and dark gray panels done so I can start beating her up. 'till then, this is all I have at the moment. Check out the highlights and shading on the individual panels. The guys at ILM never thought of that eh?


Thursday, November 24, 2011

Hobby Boss M3A1 Scout Car

This is a project I have been working on behind the scenes for Military Modelcraft International and will be featured in a future issue. The photos posted here were not submitted to the magazine, so I thought I would share them with my followers.

The resin display base is a Celticwerks base and can be found on their products page, number CWS005. The foliage is from the Silflor range and while fairly expensive, looks the part when it comes to live plants. The figure is made up of some older Verlinden airborne soldier parts taken from the spares box. 

The build was loosely based upon a photo in a Steve Zaloga book, showing a camouflaged scout car providing support to the 82nd airborne in Italy, found on page 29 of Concords, US Tank Battles- in North Africa and Italy 1943-45.


Wednesday, November 2, 2011

Darius Miniatures - Complete

Well, I apologize for the long wait but I have been distracted with many other things outside modeling. Enough of the excuses though, lets get right to it.

Since my last update I finished the wooden box on the front bumper with some dark brown oil paint and attached the figure in place and applied some Wet Effects to his boot. I painted the two signs to represent some of the areas in the no famous 'Battle of the Bulge' and added a bit on snow on the sign tops and the half track itself.

I received some advanced releases from a new company offering diorama plants and accessories, at the time of this posting, their website is still under construction and I have no word as to any sort of time frame for it's opening. The various dried plants and ground cover items are sourced from nature and appear both in scale and quite realistic, especially in context of a fall/winter setting. These items are delicate and somewhat small but are easily assembled into clusters and applied with ordinary white PVA glue.


All that was left now was to create a simple wooden base, paint it black and attach the finished vignette to it in order to complete the project. I can only try to express just how much I enjoyed working with this resin vignette from Darius Miniatures, not only does it simplify the whole process of creating a well balanced scene but it also keeps it contained to a small area on the shelf once completed. I can foresee many more of these in my future, as long as they continue to produce Allied topics that is.

*and preferably, some that aren't just knocked out vehicles.*


Wednesday, October 12, 2011

Darius Minatures - part three


So I've been a bit distracted with a few other things over the last few days but work continues on this project. I am thoroughly enjoying how quickly these come together and while I don't see myself giving up on full sized dioramas with complete vehicles and several figures, it is very refreshing to get so far, in such short time. I can guarantee a few more of these in my near future

After applying some filters to the half track I began adding some Dark Earth pigments to the base. I have applied these to represent the dirt on the ground but I have also applied them in a thin wash like mixture to a few areas on the vehicle. I suspend the pigments in the fixer to the effect of say, dirty water. Feathering this in around a few areas will help to tie the two together and set the scene. I assume this half track was pushed up and out of the way to clear a path for the passing armor. Considering this, I assume the dirt would have been thrown up onto the vehicle a bit.


In this next photo we can see the effect of the pigments on the fender and grill and along the lower section of the hood. It has made an impression without overpowering the surface, this should be the goal: subtlety.

Once the pigments were set, I used a little AK Interactive Engine Oil to further support the idea of a disabled and abandoned half track. Perhaps the oil pan was tore open as it got pushed up onto the bank. Once the first coat absorbed into the pigments I applied a second coat, closer to the center and then later a third, slowly building up the color of fresh oil and also allowing the impression of it soaking into the surrounding earth.


I mixed some Woodland Scenics snow with the AK Interactive Wet Effects and applied it in various areas, in an attempt to portray slushy piles of melting snow. I reapplied the Wet Effects in areas where the pigments absorbed it, dulling the gloss effect and will continue to do so as the product dries until I am happy with the outcome. Often times one application of something doesn't always produce the desired effects and depending on the surrounding elements, reapplications are needed.


Lastly for today even though not complete, I will share just a sneak peak at the figure simply standing in place. I just wanted to see where I was heading and show it here to anyone interested as well.

I think in the end, the figure will help to tell the story and is a very important part of the setting. I am by no means a figure painter but I think at least one is needed on this small scene and I make do with what meager ability's I have.


Saturday, October 8, 2011

Darius Minatures - part two


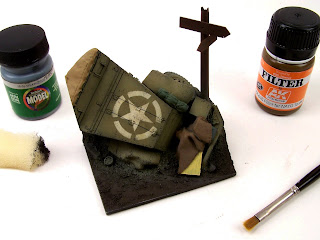
Moving right along this morning I started with some sponge 'chipping' using Model Flex Weathered Black and once it was dry went over it all with one light pass of AK Interactive filter to darken the star a bit and tie the whole surface together. The filter bottle says 'NATO tanks' but as with all products, these labels are guides to where they are best used but it doesn't mean you can apply them elsewhere. Olive drab is very similar to the green in NATO camouflage and this filter works very well for my taste.


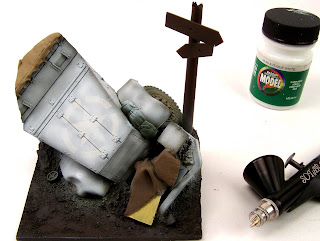
Then I used some of AK's new chipping effects, poured straight into the airbrush and misted on in two coats, the second after the first had dried completely. This seemed to behave quite nicely in the airbrush and sprayed rather smooth and trouble free. Much easier than decanting the wife's hairspray after sneaking it out of the bathroom cupboard.


I followed this up with a random coat of Model Flex Antique White, I sprayed it heavier into the nooks and crannies where it would receive the least amount of wear and made sure to remain random in the larger areas. I tried to let some of the surface color below bleed through over the whole model, heavier in some areas, less in others. This will help to gauge the thickness of paint and where it will chip off easier than other spots when I begin chipping.


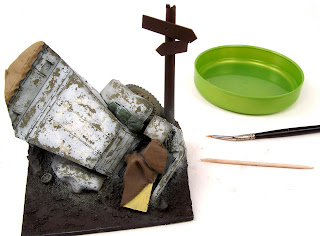
Using ordinary tap water, I began slowly picking my way around the vehicle with a small brush and a toothpick. Just as I had planned, the paint came off easiest where it was thinnest, and required more work where it was heaviest.


Next up, Mapping.


This is one of many techniques that somewhere along the line, was given a fancy name by a modeler and has been bounced around from time to time. What does it mean exactly, and why is it called mapping is anyone's guess I suppose but names notwithstanding, this is another technique that has it's merit and when combined together with other subtle effects, produce finishes that are more richer and interesting to the eye IMO.

Mapping seems to get just as much negative press as any other 'modern' painting/finishing technique and I'm not sure why. Is it simply because we don't like change? We don't understand it, or have difficulty applying it ourselves that causes us to simply dismiss it with a wave of the hand a la "these aren't the droids you are looking for"?

When considering a winter white wash in WWII we might want to consider it's properties, it's application method and it's lifespan. Whitewash was usually a low grade finish applied in the field under not the greatest of conditions, that was easily worn of and/or washed off by the rain/weather etc. The result could be several layers of applied, worn off and re-applied mixtures, all varying in tone and shade and all having different levels of dirt and wear. Some layers might be bright white, while other layers may be dingy gray.

While the chipping method alone does look great, it is merely one shade and one layer. What if this vehicle had been white washed before some rain, then redone after a new snowfall and then saw action, wouldn't there be some variation in the shades of white due to this action?

Anyway, enough talk, on to some photos.


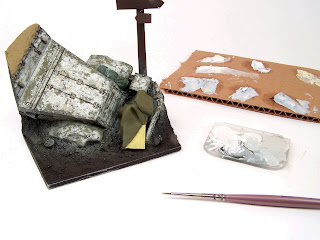
I mix up a few different shades of white oil paints with some other colors to 'dirty' them up a bit and then, I do the same with some acrylic paint. I go back and forth between the two mediums with a fine brush, using the acrylics fast drying time as well as the slowness of the oils to my advantage to created different effects


The effects should be very subtle, almost invisible at a quick glance. It's when layers of all these subtle changes come together in the end that makes the difference. I have posted a photo of three separate photos assembled side by side so the subtle shift of tones and layers becomes apparent and easier to notice. This subtle change doesn't always strike the viewer as a very important step and perhaps that is why it is so easily disregarded, in the end however it plays an important role in my whole layering process.


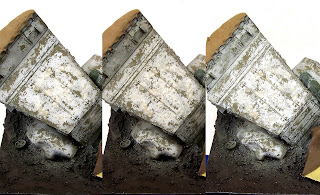
Even in the above collage, the effect is very light and subtle but that's what I'm shooting for. I don't want stark contrasts in color, just slight variations that isn't achievable with just one coat of white. Once the scene is finished it may even fade even further into the background and barely catch the viewers attention but it is none the less, an important step of the process for me which gives the model in the end, a depth not possible without it.

Thursday, October 6, 2011

Darius Miniatures


I received one of these really cool Darius Miniatures 'wedgies' from my good friend Iain Hamilton of AK Interactive USA to play with today and couldn't help but dive right in. There are only a few parts that make up the scene but they are superbly cast and all of the wedgies consist of very cool subjects.


After assembling the few parts of this particular wedgie I gave it a primer coat of black, set it aside and dug out an old Verlinden figure to set the scene. It's a German soldier in winter gear so that means dead, brown plant life, frozen ground and snow and some chipped up white wash on the half track.


I then moved on to painting this morning and have been taking photos as I go. My main objective for this project here, is to showcase the Darius product, some new AK products I just received and while I'm at it I figured I would attempt to paint as much as I can using Badger Model Flex paint sets that I won in the SMA Big Spring Contest.


First up was painting the half track. Being an almost strict builder of mainly olive drab subjects, I've grown accustom to my own personal preference of what I think the color should look like. I wasn't too keen on the Model Flex Olive Drab right out of the bottle as it seemed too green for my taste, but I mixed it with some of their Field Drab and arrived at something I could accept. For some highlights, I simply added a bit of their Antique White to the mix. All this was done with my Badger Renegade Velocity


While that dried, I used a photo etch mask and some blue painters tape and made a stencil in my usual way. These usually last me a few models but they get pretty beat up after a few uses. The trick in painting for me is very, very thin coats, as flooding the surface will only cause a ridge when the mask is removed. I sprayed a very fine mist using my trusty old Badger 100SG and when I peeled the tape there wasn't any ridge to be seen and I set that aside to dry for a bit.


Lastly for now I began mixing up various colors using Model Flex Olive Drab, Field Drab and Earth to get a few different shades for the canvas items. These paints are bright and dry with a bit of a sheen when brush painted, (which by the way took at least four coats due to their airbrush ready thinned state) but this will all be knocked down later with a dull coat and the subsequent weathering.


As always, right clicking and selecting 'open in new window' will allow much larger photos for better views of the details.

Thanks for following along, comments, questions and critiques always welcome.

Sunday, September 18, 2011

Stay on target... almost there...


at the finish line that is, not the ray shielded thermal exhaust port that's only two meters wide that leads directly to the reactor system, which by the way will set of a chain reaction after a direct hit from proton torpedoes.

I apologize for the Star Wars reference if you are not a fan. It's still a bit early here for a Sunday morning, I'm half way through my first cup of coffee and it's all I could come up with after watching the trilogy yesterday with my son.

So, yeah. This little monster of crazy small detail is just about complete. I've added some headlight lenses, painted the pick axe, glued the flexible hose in between the tankette and the trailer. I've added a bit of darker pigments in some areas to represent the older, ground in grime and attached it to a quick base I threw together with some sand and pigments. I'll add some small desert like plant life later but for all intents and purposes, this build is done appearing on the blog. Not sure what I'll post here next, I have multiple builds going on (as always) but not all of them will be seen on the internet.

Thanks for checking in, enjoy your day. It's a cool, Sunday morning, Autumn is just around the corner and we are going apple picking.

Enjoy.


Tuesday, September 13, 2011

Left field progess


I'm not sure what else to do to this besides the missing headlights and then painting of the pick-axe handle in wood grain and the head in a steel color. To be perfectly honest, the weathering appears to be missing a little something but I'm not sure what. Due to the size, I feel a little out of my element, as well as the fact that it's a desert vehicle so there's no really need for the big swaths of mud and such.

I will give this one a rest for now and go back to other projects that need my attention. For now I think I'm good, perhaps whatever it is that I feel is lacking will hit me over the next week or so. I might want to take this one to AMPS East.